前言
XAMPP被稱為是Apache好朋友,幫你把所有可能需要的環境都集中在一起,使用者只須要依照需求啟動相對應的服務即可使用,對於設定檔及Log檔案等,也是一鍵讓你馬上開啟,不用開資料夾找到天荒地老,但缺點就是你對這些服務的認識,只在於知道怎麼使用,至於如何從最基礎開始建立環境會很陌生,優點就是對開發者來說很善良,不用讓他們弄個環境弄到天荒地老。
Continue reading “建立開發PHP開發環境的好工具: XAMPP”
Camping, Yoga, Fitness, Baking, Me and Technology
XAMPP被稱為是Apache好朋友,幫你把所有可能需要的環境都集中在一起,使用者只須要依照需求啟動相對應的服務即可使用,對於設定檔及Log檔案等,也是一鍵讓你馬上開啟,不用開資料夾找到天荒地老,但缺點就是你對這些服務的認識,只在於知道怎麼使用,至於如何從最基礎開始建立環境會很陌生,優點就是對開發者來說很善良,不用讓他們弄個環境弄到天荒地老。
Continue reading “建立開發PHP開發環境的好工具: XAMPP”
[Clear all limits]
iptables -P INPUT ACCEPT
iptables -P FORWARD ACCEPT
iptables -P OUTPUT ACCEPT
iptables -t nat -F
iptables -t mangle -F
iptables -F
iptables -X
…and that should do it. iptables -nvL should produce this (or very similar) output:
Chain INPUT (policy ACCEPT 0 packets, 0 bytes)
pkts bytes target     prot opt in     out     source               destination
Chain FORWARD (policy ACCEPT 0 packets, 0 bytes)
pkts bytes target     prot opt in     out     source               destination
Chain OUTPUT (policy ACCEPT 0 packets, 0 bytes)
pkts bytes target     prot opt in     out     source               destination


Block Incoming Request From IP 1.2.3.4
The following command will drop any packet coming from the IP address 1.2.3.4:
You can also specify an interface such as eth1 via which a packet was received:
Please note that when the “!” argument is used before the interface name, the sense is inverted:
If the interface name ends in a “+”, then any interface which begins with this name will match. If this option is omitted, any interface name will match:
You can replace -I INPUT (insert) with -A INPUT (append) rule as follows:
How Do I Block Subnet (xx.yy.zz.ww/ss)?
Use the following syntax to block 10.0.0.0/8 on eth1 public interface:
# /sbin/iptables -i eth1 -A INPUT -s 10.0.0.0/8 -j DROPHow Do I Block and Log Dropped IP Address Information?
You can turn on kernel logging of matching packets with LOG target as follows:
# /sbin/iptables -i eth1 -A INPUT -s 10.0.0.0/8 -j LOG --log-prefix "IP DROP SPOOF A:"
The next rule will actually drop the ip / subnet:# /sbin/iptables -i eth1 -A INPUT -s 10.0.0.0/8 -j DROPHow Do I View Blocked IP Address?
Simply use the following command:
# /sbin/iptables -L -v
OR# /sbin/iptables -L INPUT -v
OR# /sbin/iptables -L INPUT -v -n
Sample outputs:How Do I Search For Blocked IP Address?
Use the grep command as follows:
# /sbin/iptables -L INPUT -v -n | grep 1.2.3.4How Do I Delete Blocked IP Address?
First, you need to display blocked IP address along with line number and other information, enter:
# iptables -L INPUT -n --line-numbers
# iptables -L INPUT -n --line-numbers | grep 1.2.3.4
Sample outputs:To delete line number 3 (123.199.2.255), enter:
# iptables -D INPUT 3
Verify the same, enter:# iptables -L INPUT -v -n
You can also use the following syntax:# iptables -D INPUT -s 1.2.3.4 -j DROPHow Do I Save Blocked IP Address?
If you are using Redhat / RHEL / CentOS / Fedora Linux, type the following command:
# iptables -D INPUT -s 1.2.3.4 -j DROP
##########################
#////// command to save iptables ///////#
##########################
# /sbin/service iptables save
# less /etc/sysconfig/iptables
# grep '1.2.3.4' /etc/sysconfig/iptables
For all other Linux distributions use the iptables-save command to dump the contents of an IP Table to a file:# iptables-save > /root/myfirewall.conf
Please not that you need to run the ‘iptables-save’ or ‘service iptables save’ as soon as you add or delete the ip address.A Note About Restoring Firewall
To restore your firewall use the iptables-restore command to restore IP Tables from a file called /root/myfirewall.conf, enter:
# iptables-restore < /root/myfirewall.confHow Do I Block Large Number Of IP Address or Subnets?
You need to write a shell script as follows:
#!/bin/bash _input="/root/blocked.ip.db" IPT=/sbin/iptables $IPT -N droplist egrep -v "^#|^$" x | while IFS= read -r ip do $IPT -A droplist -i eth1 -s $ip -j LOG --log-prefix "IP BlockList " $IPT -A droplist -i eth1 -s $ip -j DROP done < "$_input" # Drop it $IPT -I INPUT -j droplist $IPT -I OUTPUT -j droplist $IPT -I FORWARD -j droplist
Reference from http://blog.iadvise.eu/2008/02/12/sysman-account-is-locked/
This morning I opened Enterprise Manager and instead of the regular “login”-screen, I found following screen:

Everything is up and running but Enterprise Manager is not able to connect to the database instance. Sounds like a connection problem, not?
These are the steps I followed to solve this issue and to reset the “sysman”-account:
STEP1: Check EM log file:
[oracle@myserver log]$ pwd
/opt/oracle/product/11.1.0/db/myserver.mydomain_DWHD
/sysman/log
[oracle@ myserver log]$ tail -50 emoms.log
…
2008-02-11 23:12:04,968 [ApplicationServerThread-11]
 ERROR app.SessionObjectManager sessionDestroyed.128 -
java.sql.SQLException: ORA-28000: the account is locked
java.sql.SQLException: ORA-28000: the account is locked
…
STEP 2: Check database users:
SYSTEM> select username, account_status from dba_users;
USERNAME ACCOUNT_STATUS
------------------------------ -------------
MGMT_VIEW OPEN
SYS OPEN
SYSTEM OPEN
DBSNMP OPEN
SYSMAN LOCKED(TIMED)
STEP 3: Stop the Database Console
[oracle@myserver dbascripts]$ emctl stop dbconsole
Oracle Enterprise Manager 11g Database Control Release 11.1.0.6.0
Copyright (c) 1996, 2007 Oracle Corporation. All rights reserved.
https://myserver.mydomain:1158/em/console/aboutApplication
Stopping Oracle Enterprise Manager 11g Database Control ...
... Stopped.
[oracle@myserver dbascripts]$
STEP 4: Reset the SYSMAN-account
[oracle@myserver log]$ sqlplus "/ as sysdba"
SQL*Plus: Release 11.1.0.6.0 - Production on Tue Feb 12 09:51:59 2008
Copyright (c) 1982, 2007, Oracle. All rights reserved.
Connected to:
Oracle Database 11g Enterprise Edition Release 11.1.0.6.0 – 64bit Production
With the Partitioning, OLAP, Data Mining and Real Application Testing options
SYS> alter user sysman identified by <new_password> account unlock;
User altered.
STEP 5: Reset the SYSMAN-account in the “targets.xml”-file ($ORACLE_HOME/myserver.mydomain _mySID/sysman/emd) and modify the “Username”-Property and the “Password”-property as follows:
[oracle@myserver emd]$ pwd
/opt/oracle/product/11.1.0/db/myserver.mydomain_DWHD/sysman/emd
[oracle@myserver emd]$ cp targets.xml targets.xml.ori
[oracle@myserver emd]$ vi targets.xml
…
<Property NAME="UserName" VALUE="SYSMAN" ENCRYPTED="FALSE"/>
<Property NAME="password" VALUE="<new_password>" ENCRYPTED="FALSE"/>
…
STEP 6: Reset the SYSMAN-account in the “emoms.properties”-file ($ORACLE_HOME/myserver.my_domain_mySID/sysman.config) and modify the “oracle.sysman.eml.mntr.emdRepPwd”-parameter and the “oracle.sysman.eml.mntr.emdRepPwdEncrypted” in the following way:
[oracle@myserver config]$ pwd
/opt/oracle/product/11.1.0/db/myserver.mydomain_DWHD/sysman/config
[oracle@myserver config]$ cp emoms.properties emoms.properties.ori
[oracle@myserver config]$ vi emoms.properties
…
oracle.sysman.eml.mntr.emdRepPwd=<new_password>
…
oracle.sysman.eml.mntr.emdRepPwdEncrypted=FALSE
…
STEP 7: Start the Database Console
[oracle@myserver dbascripts]$ emctl start dbconsole
Oracle Enterprise Manager 11g Database Control Release 11.1.0.6.0
Copyright (c) 1996, 2007 Oracle Corporation. All rights reserved.
https://myserver.mydomain:1158/em/console/aboutApplication
Starting Oracle Enterprise Manager 11g Database Control ...... started.
------------------------------------------------------------------
Logs are generated in directory
/opt/oracle/product/11.1.0/db/myserver.mydomain_DWHD/sysman/log
STEP 8: Test

最近面試之後,深深覺得我這幾個月看android真是亂無章法,雖然都有在作筆記,但是發現東一塊西一塊的。
很不幸的是,我又開始追另外一小塊,它就是CTS。
CTS是google提供給android作自動化測試的一個工具,陽不陽春我也不知道,我才剛剛開始碰他。
step 1:android 2.2 編譯完
step 2:#cd android_folder
#. build/envsetup.sh
#make cts
接著就是等待
step 3: 如果看到最後一行為
Package CTS: out/host/linux-x86/cts/android-cts.zip
就完成了
step 4:此時可以啟動你的emulator或是device,接著
#cd out/host/linux-x86/bin
#./cts
此時,正常會出現
Android CTS version 2.2_r1
Device(XXXXXXXX) connected
cts_host>
FAQ: 如果遇到Max ADB operations reached. Restarting ADB…,請修改out/host/linux-86/cts/android-cts/repository/host_config.xml中的maxTestCount為-1,但是先前條件需保證adb不會自動斷線。
step 5: cts_host>ls –plan #list all plans
cts_host>start –plan XXXXX # XXXXX means the name of plan
Modify /system/etc/vold.fstab
dev_mount sdcard /mnt/sdcard 3 /devices/platform/mmci-omap-hs.0/mmc_host/mmc0
The red word was changed into ‘auto’.
But I do not why I must do this. Another problem is still existed.
That is that “ls /sdcard” can not see any files. But “ls /mnt/sdcard” can see the files in the sdcard.
P.S. sdcard and /mnt/sdcard have a link.
Now, I only find a problem that I can not build SDK due to windows 7 64bit version. I solve it using the step 5.
I recently bought a new PC and I choosed a machine based on the 64bit version of Windows 7.
Using a 64bits OS will allow me to use more than 4GB of RAM and this is quite important for me because it will allow me to run multiple virtual machines to test beta products and keep some customers’ development environment isolated from the others (for example for customers that need to test and certify each installed QFE and may allow me to install them on my development machine some time after their availability).
On the other side running VS2005 and the Windows CE tools on the “main OS” istead of running them inside the virtual machine will provide better performances and avoid some of the issues of virtualization (limited or wasted disk space, issue with some devices, like USB devices etc.), so I decided to install the tools on Win7-64bit as my main working environment and leave virtual machine for specific configurations.
This is an unsupported scenario for Windows CE development tools, so I’m not suggesting that you should upgrade your OS to 64bit if you are happy with your current 32bit setup.
In this post I’ll try to report all the issues that I found with my setup and, hopefully, provide solutions (and maybe workarounds) to make Windows CE development possible on 64-bit machines.
As usual the first problems may happen during the tools installation.
First of all if you have newer releases of Visual Studio currently installed on your development machine you should unistall them and re-install them after you have set-upped VS2005 and Windows CE Plaform Builder.
You should run all the setup application as an Administrator, so you should give administrator rights to your current user (you may need to do that also to run VS2005) or, at least, right click on the setup executable and choose “Run as administrator”.
The first issue I found is an error (2738) when the setup tries to run some vbscript code to complete the installation.
To fix this issue you should execute your command prompt as administrator (right click on cmd.exe or use this “trick” to create an administrative command prompt shortcut on your desktop or start menu) and re-register the vbscript runtime.
First of all, remove current registration information:
reg delete “HKCU\SOFTWARE\Classes\Wow6432Node\CLSID\{B54F3741-5B07-11CF-A4B0-00AA004A55E8}” /f
Then register the 64-bit version of vbscript.dll:
regsvr32 C:\Windows\SysWOW64\vbscript.dll
(the actual path of the DLL may vary if you have chosen a different path for the Windows folder)
Now you can run (as administrator!) the required installations:
– Visual Studio 2005
– Visual Studio 2005 service pack 1
– Visual Studio 2005 patch for Vista
– Windows CE setup
– Windwows CE 6 Platform Builder SP1
– Windows CE R2 setup
– Windows CE R3 setup
Then I suggest to try to build a simple OSDesign to check that all the components of the Windows CE build system are working correcly.
On my machine to install QFEs I needed to register again the vbscript runtime. I restarted my PC after VS2005/Windows CE installation and also installed some Windows updates, so you may not need to do that if you install the QFEs immediately after the setup of the main OS.
To speed-up QFEs setup I usually write a .bat file that install them in sequence using msiexec. Here’s the code of a sample batch file that installs QFEs for ARM and x86 from march to june:
f:
cd F:\Download\WinCE\QFEs\WINCE600
reg delete “HKCU\SOFTWARE\Classes\Wow6432Node\CLSID\{B54F3741-5B07-11CF-A4B0-00AA004A55E8}” /f
regsvr32 c:\windows\syswow64\vbscript.dll
regsvr32 c:\windows\syswow64\jscript.dll
start /wait WinCEPB60-100331-2010M03-Armv4I.msi
start /wait WinCEPB60-100331-2010M03-X86.msi
start /wait WinCEPB60-100430-2010M04-Armv4I.msi
start /wait WinCEPB60-100430-2010M04-X86.msi
start /wait WinCEPB60-100630-2010M06-Armv4I.msi
start /wait WinCEPB60-100630-2010M06-X86.msi
You may also use the /quiet or /passive command line switch to perform non-interactive setup of all the QFEs, but I suggest to keep the setup interactive the first time you install QFEs on a new machine to ensure that you’ll be notified about any setup issue.
You can create your batch file by running:
dir /on /b > mybatch.bat
Inside your Windows CE QFEs directory.
Some of the VS2005/Windows CE components may require network access to work. If you have the Windows Firewall enabled you will be prompted with the following authorization dialog:

This will happen also on 32bit machine.
Some devices use a USB connection for downloading and debugging of the OS image on the target. Some of them use RNDIS to emulate a network connection over USB and require a driver to operate.
This driver is part of the Windows7 install, but you need to tell to the system where it can find it.
As soon as your device is detected the OS will try to automatically find a driver for it, but fails:

Now you can go to the computer management console (right click on “my computer” and choose “manage”), and open device manager:

The RNDIS kitl device is marked with an exclamation mark to point out that its driver is not running.
Right click on it and choose “update driver”, you’ll be prompted with the driver selection wizard.
On the first step:

select “Browse my computer for driver software” and you will be prompted with the driver selection dialog:

Choose “Let me pick from a list of device drivers on my computer” and you’ll see the device category list:

Select “Network adapters” (RNDIS emulates a network connection) , and then “Microsoft Corporation” (don’t ask me about the differences between “Microsoft” and “Microsoft Corporation” here!):

Now you should select: “Remote NDIS compatible device”:

Now your new KITL device is up and running and you’ll be able to download your OS images to it as you do with devices with a “regular” ethernet connection to your PC.

If you need to connect to a RNDIS device from a virtual machine is usually easier to set-up the RNDIS driver on your “real” machine and then share it with the virtual machine as you do with other network connections.
If you are running Windows CE development tools on a 64bit machine and found other issues that I did not cover in this entry (and did not experience!) and want to share some tips-and-tricks with other developers, write a comment here and I’ll be happy to update this entry, giving you credit for the tip, of course.
Usually after you’ve built and tested your OS image you need to generate an SDK to provide to application developers all the libraries, include files and documentation they need to develop applications targeted to your specific device.
The SDK configuration wizard works with no issues on my 64bit machine, but the build SDK command generated an error:
‘C:\Program’ Files (x86)\Microsoft Visual Studio 8\Common7\IDE>”C:\Program Files (x86)\Microsoft Platform Builder\6.00\cepb\IdeVS\GenSdk.exe” “C:\WINCE600\OSDesigns\S4WE\S4WE\SDKs\SDK1\obj\BuildSDK1.xml”
Required files may be missing. To resolve the issue, reinstall Platform Builder.
This happens because GENSDK.EXE (the tool that “packs” all the files required for your SDK in a MSI file that you can redistribute and install on developer’s machines) is a .NET application that is spawned from PB and runs in 64bit mode. 64bit mode has its own registry and the configuration keys generated by PB setup are only in the 32bit registry. That generates the problem.
To fix it we can just develop a small .NET application, force it to run as 32bit (x86) and reference GENSDK.EXE as an external assembly, invoking its main method from our new 32bit app. This will force GenSdk to run as a 32bit app, finding all the registry information it needs to complete the SDK build.
To create this new project select “File\New Project…” from the VS2005 menu.
The new project wizard appears:

Select Visual C#\Windows as project type and “Console Application” as template. I called my “wrapper” GenSDK32.
Chose “OK” and you are ready to develop your GenSDK wrapper application.
The first step is to add a reference to the “real” GenSDK application. Right click on the “references” entry in your project inside Solution exporer:

The Add Reference dialog appears:

Select the “Browse” tab and navigate to the directory where gensdk.exe is located (usually “C:\Program Files (x86)\Microsoft Platform Builder\6.00\cepb\IdeVS”), select GenSdk.exe and press “OK”.
 Now a reference to GenSdk assembly has been added to your project.
If you double click on it you’ll be able to discover the object and namespace that it implements:
 as you can see it implements just one object (the main application class), that implement method Main.
Let’s see how we can call it from your code.
This is the code that the wizard generated for our application:
using System;
using System.Collections.Generic;
using System.Text;
namespace GenSdk32
{
class Program
{
static void Main(string[] args)
{
}
}
}
To call the Main method of GenSDK we need to add just one line, inside our own Main method:
static void Main(string[] args)
{
Microsoft.PlatformBuilder.Sdk.SdkGenerator.GenSdk.Main(args);
}
Before we can build our application we need to configure it as 32bit only. We can do that by double clicking on the “Properties” node in Solution Explorer, this will bring up the project properties page:

Select the “Build” tab, choose “Release” as active configuration, and “x86” as Platform Target for your application.
Now you are ready to build it by choosing “build\build solution” from the VS2005 menu.
Now you can copy gensdk32.exe to the same directory where gensdk is installed.
To build our SDK we have to run gensdk32 from the PB command line. Go back to your OSDesign and choose “Build\Open release directory”.
Now you can copy and paste the command line of the previous failed gensdk.exe execution and replace it with gensdk32.exe:
“C:\Program Files (x86)\Microsoft Platform Builder\6.00\cepb\IdeVS\GenSdk32.exe” “C:\WINCE600\OSDesigns\S4WE\S4WE\SDKs\SDK1\obj\BuildSDK1.xml”
And your SDK will be built!
If you are too lazy to build your own gensdk32 project, you can download mine from here:
The PBXMLUtils application has the same issue of GenSDK but, unfortunately, it does not provide access to its main application class and so you can’t build a 32-bit wrapper for it.
PBXMLUtils is used to generate makefiles and batch files from a PBXML file and also to update subroject configuration files. If you experienced problems with .bib and .reg settings of your subprojects not being included in the final image, you’ll have to covert PBXMLUtils.exe to 32 bits.
To do this you can use the corflags.exe utility that is part of Visual Studio installation.
Just open the VS Tools command prompt from the Visual Studio folder of your start menu and execute:
CorFlags “C:\Program Files (x86)\Microsoft Platform Builder\6.00\cepb\IdeVS\PBXMLUtils.exe” /32BIT+
(path of PBXLUtils may be different on your PC and it’s a good idea to do a backup copy of that file before you manipulate it.
|
The content from http://arm9.org.ru/redirect.php?tid=356&goto=lastpost Android uses a structure “JNINativeMethod” to describe the JNI function as follows: typedef struct { “(II)V” means “void Func(int, int)”;
V void void The above types discussed are standard. If the parameter is “class” type, start with “L” and end with “;”. Using “/” to separate package name and class name. And the parameter mapping to C is “object” except for String class. Its mapping is jstring. Ljava/lang/String; String jstring If Java function is placed in the embedded class, Using “$” as separated character. i.e. “(Ljava/lang/String;Landroid/os/FileUtils$FileStatus;)Z” |
看起來很讚!
果然是open source
Refer to http://changyy.pixnet.net/blog/post/27992240
先前聽說許多關於 Android 程式很容易被逆向工程,我也抱持這樣的觀點去戳 Android 開發者 XDD 直到今天開完會,前輩跟我說 Android 產生出的 dex file 很難閱讀,因此我就去找一下相關資料,找到一篇 2007/11/28 How to decompile .dex file on Android 文章,上頭也是敘述要去解讀 dex 有點不好讀,但隨後找到 2009/08/08 decompiling DEX into Java sourcecode 這篇文章,細看一下原來還有 dex2jar 的方式!這下可好了…
所以,咱們來試試吧!我在 Ubuntu 10.04 的環境下測試
準備工具:
接著就把 dex2jar 解壓縮出來,並執行
$ cd dex2jar-0.0.7.7-SNAPSHOT
$ sh dex2jar.sh MyWidget.apk
然後就會看到一個對應的 jar 檔:MyWidget.apk.dex2jar.jar
解壓縮 JD-GUI 去開啟 MyWidget.apk.dex2jar.jar 檔案,不囉唆,程式碼就可以看了!整個過程不用 30 秒吧!打快一點可能 3 秒喔 XD
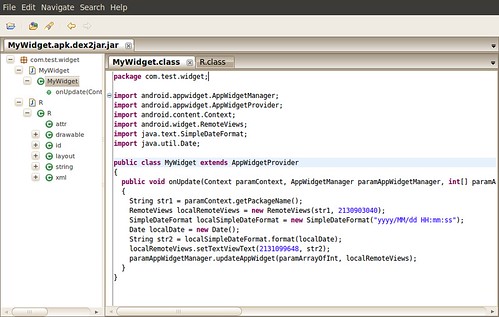
這…還真的叫我難以投入 Android 開發啊 *誤* 不過仔細一看,之前在 MyWidget 寫的程式,有些地方式用 R.layout.main 的地方,已經直接被換成數值了,但我想這樣也不會太難閱讀,畢竟整個 source code 都丟在你眼前了!更別提 dex2jar 仍然很活躍地進行維護及開發,真的開感謝一下對岸,第一次看到簡體中文有那種莫名的感動 XD 太多東西都嘛是英文先衝啦
至於 dex2jar 的原理,可以參考這邊:介绍dex2jar的核心思想,有原理才會有相對應的解法喔!
順便筆記一下 iPhone 的:
arm-elf-objcopy -I binary -O elf32-littlearm iPhoneApp out.elf && arm-elf-objdump -marm9 -D out.elf
但組語嘛,雖然學過,但我想我應該看不下去 XD
最後,關於逆向工程的事情,如果程式碼非常冗長,那一樣不好啃啊!所以,玩玩就好。
1. Add the urls into update list
sudo add-apt-repository “deb http://us.archive.ubuntu.com/ubuntu/ jaunty multiverse”
sudo add-apt-repository “deb http://us.archive.ubuntu.com/ubuntu/ jaunty-updates multiverse”
2. Update the repository
sudo apt-get update
3. Install java sdk 1.5
sudo apt-get install sun-java5-jdk
4. Switch the version of SDK
sudo update-java-alternatives -s java-5-sun
New version for android sdk r8
export PATH=${PATH}:/usr/lib/android/android-sdk-linux_86/tools:
/usr/lib/android/android-sdk-linux_86/platform-tools
The four instructions for using “logcat” in JNI:
1. Include the header file “android/log.h” as follows:
#include <android/log.h>
2. Define the need functions as follows:
I only the one.
#define LOGD(…) __android_log_print(ANDROID_LOG_DEBUG , “liblog”,__VA_ARGS__)
Other functions is below:
#define LOGV(…) __android_log_print(ANDROID_LOG_VERBOSE, “liblog”,__VA_ARGS__)
#define LOGI(…) __android_log_print(ANDROID_LOG_INFO, “liblog”,__VA_ARGS__)
#define LOGW(…) __android_log_print(ANDROID_LOG_WARN, “liblog”,__VA_ARGS__)
#define LOGE(…) __android_log_print(ANDROID_LOG_ERROR, “liblog”,__VA_ARGS__)
3. You can use the LOGD function in the source code.
LOGD(“Debug Message is from JNI”);
4. Add some words in the file “Android.mk”
LOCAL_LDLIBS := -L$(SYSROOT)/usr/lib -llog
P.S. I refer some information that tell me add the line under “LOCAL_PATH := $(call my-dir)”. When I build the JNI code, the undefined reference always happened. So I move the line above the line “include $(BUILD_SHARED_LIBRARY)”, then the error disappeared. I think that the reason is the path of the directory.