Android CTS Note

最近面試之後,深深覺得我這幾個月看android真是亂無章法,雖然都有在作筆記,但是發現東一塊西一塊的。

很不幸的是,我又開始追另外一小塊,它就是CTS。

CTS是google提供給android作自動化測試的一個工具,陽不陽春我也不知道,我才剛剛開始碰他。

step 1:android 2.2 編譯完

step 2:#cd android_folder

         #. build/envsetup.sh

         #make cts

         接著就是等待

step 3: 如果看到最後一行為

          Package CTS: out/host/linux-x86/cts/android-cts.zip 

          就完成了

step 4:此時可以啟動你的emulator或是device,接著

         #cd out/host/linux-x86/bin

         #./cts

         此時,正常會出現

         Android CTS version 2.2_r1

         Device(XXXXXXXX) connected

         cts_host>

         FAQ: 如果遇到Max ADB operations reached. Restarting ADB…,請修改out/host/linux-86/cts/android-cts/repository/host_config.xml中的maxTestCount為-1,但是先前條件需保證adb不會自動斷線。

step 5: cts_host>ls –plan  #list all plans

        cts_host>start –plan  XXXXX   # XXXXX means the name of plan

Damaged SD Card

Modify /system/etc/vold.fstab

dev_mount sdcard /mnt/sdcard 3 /devices/platform/mmci-omap-hs.0/mmc_host/mmc0

The red word was changed into ‘auto’. 

But I do not why I must do this. Another problem is still existed.

That is that “ls /sdcard” can not see any files. But “ls /mnt/sdcard” can see the files in the sdcard.

P.S. sdcard and /mnt/sdcard have a link.


Android JNINativeMethod

The content from http://arm9.org.ru/redirect.php?tid=356&goto=lastpost

Android uses a structure “JNINativeMethod” to describe the JNI function as follows:

typedef struct {
    const char* name;
    const char* signature;
    void*       fnPtr;
} JNINativeMethod;

name: name of function in Java
signature: used to describe the parameters and return values of function
fnPtr: function pointer that point to C function。

Take some examples for second parameter:
“()V”
“(II)V”
“(Ljava/lang/String;Ljava/lang/String;)V”

“()” stands for the parameter, the later represents the return value.
Take “()V” as an example. It means “void Func();”

“(II)V” means “void Func(int, int)”;

Mapping table as below:


character     C type         Java type

V                  void             void
Z                  jboolean       boolean
I                   jint               int
J                   jlong            long
D                  jdouble        double
F                  jfloat            float
B                 jbyte             byte
C                 jchar             char
S                 jshort           short

“array” denoted two characters as below:

[I       jintArray        int[]
[F       jfloatArray      float[]
[B       jbyteArray       byte[]
[C       jcharArray       char[]
[S       jshortArray      short[]
[D       jdoubleArray     double[]
[J       jlongArray       long[]
[Z       jbooleanArray    boolean[]

The above types discussed are standard. If the parameter is “class” type, start with “L” and end with “;”. Using “/” to separate package name and class name. And the parameter mapping to C is “object” except for String class. Its mapping is jstring.

Ljava/lang/String;     String         jstring
Ljava/net/Socket;      Socket         jobject

If Java function is placed in the embedded class, Using “$” as separated character.

i.e. “(Ljava/lang/String;Landroid/os/FileUtils$FileStatus;)Z”

[轉]Android 開發教學筆記 – 關於反組譯 Android 程式,還真的不用 30 秒就搞定!

看起來很讚!

果然是open source

Refer to http://changyy.pixnet.net/blog/post/27992240

先前聽說許多關於 Android 程式很容易被逆向工程,我也抱持這樣的觀點去戳 Android 開發者 XDD 直到今天開完會,前輩跟我說 Android 產生出的 dex file 很難閱讀,因此我就去找一下相關資料,找到一篇 2007/11/28 How to decompile .dex file on Android 文章,上頭也是敘述要去解讀 dex 有點不好讀,但隨後找到 2009/08/08 decompiling DEX into Java sourcecode 這篇文章,細看一下原來還有 dex2jar 的方式!這下可好了…

所以,咱們來試試吧!我在 Ubuntu 10.04 的環境下測試

準備工具:

  • dex2jar
    • A tool for converting Android’s .dex format to Java’s .class format
  • JD-GUI
    • JD-GUI is a standalone graphical utility that displays Java source codes of “.class” files. 
  • 一份編譯好的 apk 檔案

接著就把 dex2jar 解壓縮出來,並執行

$ cd dex2jar-0.0.7.7-SNAPSHOT
$ sh dex2jar.sh MyWidget.apk

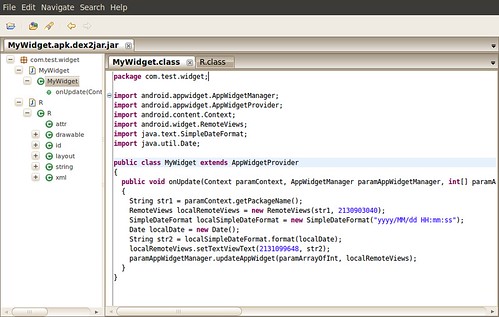
然後就會看到一個對應的 jar 檔:MyWidget.apk.dex2jar.jar

解壓縮 JD-GUI 去開啟 MyWidget.apk.dex2jar.jar 檔案,不囉唆,程式碼就可以看了!整個過程不用 30 秒吧!打快一點可能 3 秒喔 XD

dex2jar2JD-GUI

這…還真的叫我難以投入 Android 開發啊 *誤* 不過仔細一看,之前在 MyWidget 寫的程式,有些地方式用 R.layout.main 的地方,已經直接被換成數值了,但我想這樣也不會太難閱讀,畢竟整個 source code 都丟在你眼前了!更別提 dex2jar 仍然很活躍地進行維護及開發,真的開感謝一下對岸,第一次看到簡體中文有那種莫名的感動 XD 太多東西都嘛是英文先衝啦

至於 dex2jar 的原理,可以參考這邊:介绍dex2jar的核心思想,有原理才會有相對應的解法喔!

順便筆記一下 iPhone 的:

arm-elf-objcopy -I binary -O elf32-littlearm iPhoneApp out.elf && arm-elf-objdump -marm9 -D out.elf

但組語嘛,雖然學過,但我想我應該看不下去 XD

最後,關於逆向工程的事情,如果程式碼非常冗長,那一樣不好啃啊!所以,玩玩就好。

2010.10.21 How to use "logcat" in JNI

The four instructions for using “logcat” in JNI:

   1. Include the header file “android/log.h” as follows:

           #include <android/log.h>

   2. Define the need functions as follows:

       I only the one.

           #define LOGD(…) __android_log_print(ANDROID_LOG_DEBUG  , “liblog”,__VA_ARGS__) 

      Other functions is below:

           #define LOGV(…) __android_log_print(ANDROID_LOG_VERBOSE, “liblog”,__VA_ARGS__)

           #define LOGI(…) __android_log_print(ANDROID_LOG_INFO, “liblog”,__VA_ARGS__)

           #define LOGW(…) __android_log_print(ANDROID_LOG_WARN, “liblog”,__VA_ARGS__)

           #define LOGE(…) __android_log_print(ANDROID_LOG_ERROR, “liblog”,__VA_ARGS__)

   3. You can use the LOGD function in the source code.

          LOGD(“Debug Message is from JNI”);

   4. Add some words in the file “Android.mk” 

          LOCAL_LDLIBS :=  -L$(SYSROOT)/usr/lib -llog

      P.S. I refer some information that tell me add the line under “LOCAL_PATH := $(call my-dir)”. When I build the JNI code, the undefined reference always happened. So I move the line above the line “include $(BUILD_SHARED_LIBRARY)”, then the error disappeared. I think that the reason is the path of the directory.

Failure [INSTALL_FAILED_INSUFFICIENT_STORAGE]


The storage of the internal memory is enough. So the error was happened due to the permission for writing.  

1.First check the

Android -> Settings -> Applications -> Unknown sources to be set

2.make sure the /data/app can be written. It means the mode of the directory is rwxrwxr_x(775).